DNS Upgrade - Projected completion 12DEC08 (all access points will be migrated to new switch - if DNS configuration is not correct, you will not be able to open web pages or check email)
There are two methods of network configuration on your PC.
The first requires manual
IP addressing in the network configuration (old style bridges using coax
to connect to external antenna).
 That's what this document will help you with.
The second requires zero (none) configuration because
the new Tranzeo "Customer Premise Equipment" has a built in router and provides
the customer's computers with IP addressing.
 This doocument focuses on changing
the Name Server settings for the first case, the manual IP setups.
This doocument focuses on changing
the Name Server settings for the first case, the manual IP setups.
We have upgraded to a new Cisco switch which does routing, but does not provide DNS information like the previous, old architecture routers we are replacing. We are using DNS servers from opendns.org which allows us to better control and monitoring our DNS.
To begin with, the change will affect only about half the customers. For those customers, the Name Servers in their computer’s Network Configuration must be changed. These MUST be changed or you will not be able to access email or websites.
PLEASE NOTE THESE EXCEPTIONS:
If you are using a router, whether wired or wireless, the router will have to have its configuration changed and not the computer’s. When you opened the “Internet Protocol (TCP/IP) Properties” window, if the addressing was set to “Obtain an IP address automatically” then you have a router providing your network addressing. The computer may still be configured with our DNS server information.
Below is a pictorial guide on how to accomplish this change.
First, Click on the “Start” button in the lower left corner of the display and then select “Control Panel”.
Second, when the “Control Panel” window opens, double click on the “Network Connections” icon. NOTE: If you do not see the view shown below, click on the “Switch to Classic View” located to the left of the icons. In the view below, it is “Switch to Category View”.

Third, right click on the active “Local Area Connection” in the LAN or High Speed Internet group. Then, select “Properties” in the popup menu.

Fourth, in the “Local Area Connection Properties” window, in the section, “This connection uses the following items:” scroll down to the bottom of the list to “Internet Protocol (TCP/IP)”. Then click on the Properties button, as shown below.

Fifth, in the window that appears, “Internet Protocol TCP/IP Properties,” you will see in the lower area, “Use the following DNS server addresses.” It may have 192.168.100.1, 192.168.120.1 or 192.168.140.1 (image below not accurate).
If the addresses 67.59.64.7 and 67.59.64.8 are listed, QUIT now, these are OK.
If the addresses 208.67.222.222 and 208.67.220.220 are listed, QUIT now, these are also OK. In fact these are preferred.
If your settings are for "Obtain an IP address automatically", QUIT now, you are OK.
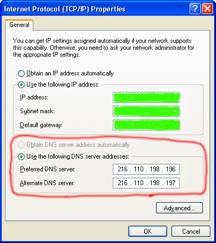
Sixth, after deleting the old DNS server addresses (except as noted above in step 5), enter the two new DNS server addresses. These addresses should NOT be the same as the “Default Gateway” address.

Click on the “OK” button to save the settings (above picture). And the click the “Close” button to finish.

Please call us at 815-8631 if you have any questions or your configuration does not look like these images.